About Me

My photo
This is a blog for John Weber. One of my joys in life is helping others get ahead in life. Content here will be focused on that from this date forward. John was a Skype for Business MVP (2015-2018) - before that, a Lync Server MVP (2010-2014). I used to write a variety of articles (https://tsoorad.blogspot.com) on technical issues with a smattering of other interests. I have a variety of certifications dating back to Novell CNE and working up through the Microsoft MCP stack to MCITP multiple times. FWIW, I am on my third career - ex-USMC, retired US Army. I have a fancy MBA. The opinions expressed on this blog are mine and mine alone.

2014/05/16

NextHop Archive


If, like me, you have stretches of your life where you are living under a rock, you may have missed the notification that NextHop is being moved and phased out.  As noted in this article posted on NextHop 1 May 2014, NextHop content is frozen, with no new content to be added.  While there is a stated plan to migrate SOME NextHop content to its’ new home, I think it is very possible that not ALL content will migrate.  In addition, there are sub-contents (such as DrRez) (and the absolutely awesome Haiku material) that may not make the jump.

In an effort to preserve this data, I archived the entire NextHop site.  DrRez included.  You can find the archive here:

https://www.dropbox.com/s/g9wo9sg2835xd7z/NextHopArchive.zip

YMMV

2014/05/14

AudioCodes 440HD SIP Phone Review

I have been working with an AudioCodes 440HD SIP Phone for a few days now, and am finally prepared to make some comments.

Background Reading

First off, let’s look at the market-speak.  Here is the official blurb. And you may want to review my comments vis-à-vis the AudioCodes 420HD which will save me from repeating my comments on build quality, audio quality, and Lync support.

image [image%255B3%255D.png]

(for those who need to be told the 440HD is on the left)

The biggest difference between the two unit is the obvious; a built-in side-car with 12 programmable buttons which allow you to pre-set speed dials.The display is also larger; although not in color or touch. Me, and a bazillion other folks in this world like color.  Except that color and touch costs.  And the LCD functionality of the 440HD is clear, crisp, and legible.  And touch screen phones that I have had the privilege of using are sometimes finicky, picky, and near schizophrenic when it comes to the touch screen.  The 440HD is none of that.  The buttons are large, well-marked, they light up, and pushing the button elicits the response you expected.  Overall, a compromise solution that I understand and endorse.  Well done, IMHO.

A Few Gently Worded Observations

On the plus side, the built-in switch is GbE.  Sweet!  In addition, the 440HD will support the upcoming BToE firmware.  For information purposes, my 440HD updated itself to the newest beta BToE firmware with very little effort on my part.  I dropped the image into my FTP, and on the next power-cycle, the 440HD updated itself.  Painless. 

According to the official user guide, the 440HD also has a built-in busy-on-busy feature.  As a comment on the “official documentation” I will note that the screen caps in the documentation do not exactly match the displays on the phone.  But they are close enough to enable someone with more than a few operational brain cells to figure it out.  Having only two of those myself, I had to read stuff twice to make sense of it all.

Here is the doc

image

And here is the actual device

image

I strongly recommend reading the user guide, with 6 lines, 6 multi-function keys, 4 programmable keys, and 12 speed dial keys, the number of options on how to use this Lync phone, if my math is correct, approach the 1440 level. When you throw in the idea that you can also set sub-options, both of brain cells started to overflow. If that is not enough to cause your users to ask questions of you the expert, I don’t know what will.

Like the 420HD, the 440HD also supports location information; if your Lync environment is configured for location, you can choose a location as defined by your administrator so as to support E9-1-1.  Convenient if you want the emergency providers to show up at your door in Portland, Oregon, instead of the corporate headquarters in Chicago, Illinois.

The speed dial keys assignments can be selected out of the corporate directory!  Score!  And if you select the default call type (speed dial + BLF) (BLF = Busy Lamp Field) you can have the presence shown on the phone. Very nice.  In this finely focused picture, you can see four speed-dials configured.  The top one I have to use occasionally Disappointed smile, the second is without the BLF, the next two coincidentally show a busy and an available.  Ain’t that purty?

image

As a documentation note, if you are a norteamericano user, some of the terminology in the supporting documentation may be either amusing or confusing, depending.  For instance, to edit the aforementioned speed dial, here are the instructions:

image

I get it.  But, you have to know that I almost went and dug out my drafting supplies looking for my protractor set.

If you don’t want to use the keypad for login, and you are an external/remote user (like me), you have two options for login.  You can use the BToE (when it emerges from beta), or you can go into the web interface and enter your credentials.  BToE is covered here.  Let’s take a look at the web interface.

Press the menu button, then scroll down to the “Status” option. Under “Network Status” you will find the IP address that is assigned to the phone.  Using a standard browser, open http://whateveryouripis

image

With no-one is signed into the phone, the username is Admin and the PW is 1234.  Then select Configuration and Quick Setup.

image

Then simply fill in the data and click submit.

image

Logoff the web interface, then go to the phone and select “Status” and “Sign-in” and you should sign in.  For some reason, the phone does not like having you sign out; if you do, don’t be too surprised to have to go enter your password again.  I don’t understand why the phone does not hold the password in that scenario, but I will assume that an engineering decision was made that if you sign out of the phone then you don’t want to sign back in.  Which is a royal PITA for those of us who cannot use ext+PIN for login.  Adelante!

Summary

If you are looking at SIP phones, then this unit should be on your short list. The AudioCodes 440HD (their entire phone line actually) demonstrates very high quality in terms of packaging, build, and function. Audio quality is top-notch. In terms of price, very competitive.  A winner.

YMMV

Jabra Motion UC+ MS Review


More toys!  First up is the Jabra Motion UC+ MS.  Here is the market speak straight from Jabra.com.  Please note that the tested unit is the “…with travel and charge kit”

image

What’s in the box

First off, build quality is typical Jabra, right at the top of the pack. While the microphone boom folds and unfolds to provide the on/off function, it did not feel flimsy like the old Motorola HD devices did.  The Jabra feels substantial.

A nice half-moon, hard case that holds everything except the wall charger.  Everything includes the USB dongle, a USB cord, two extra ear-piece adapters, and the Jabra Motion itself.  The case itself is pretty nice; well made and provides a single spot to hold everything needed.  Well, except for the wall charger.  But, if you are on the road, most likely you will have your laptop and you can charge from that using the included USB cable.

image

The market speak (see above) claims 8 hours of talk time and 360 hours of standby.  I have been using this device for two straight days and it is still going.  When a call arrives, putting the unit into your ear answers the phone without having to push any buttons.  Nice.

Jabra claims a 100 meter range from base to unit.  I don’t know about that.  My cell phone would disconnect at about 30 feet (I assume the difference is in the BlueTooth version on the cell) and I don’t have a 100 meter known-distance-range to test the dongle range – but it seems to be pretty good.

I could not test the NFC pairing feature because my iPhone does not have that.  Hello!  Apple!  Are you listening?

An annoying?  nice?  feature:  power off if not in use.  But it resumes immediately upon speaking – whereby you get an aural notification and the device reconnects to the phone.  This feature uses the same motion sensors used to pick up the call when you put the device up to your ear.  I will note that in testing, when the device announces power off, it also seemed to resume aurally.  However, it only did that once, so I cannot comment further – maybe my head was shaking or something.  Either way, when in auto-power-off, the device resumed immediately.

Audio Quality

On the TsooRad Goodness scale, the audio of this device ranks at a 9.5 of 10.  In other words, nothing is perfect.  But I could not find any fault either.  Solid.  Good timbre, good volume, sound reproduction is crisp and accurate.

Lync Compatible

Note that my interest in this unit is the ability of the device to pair to my cell (an iPhone in my case) and my laptop at the same time.  How does that work?  Seamlessly.  Literally.  With no further effort on my part other than being logged into my Lync client and plugging the included USB dongle into an available port, I was making and taking calls with Lync but now I had the audio in my ear; at the same time, my cell operated as expected.  So nice.  Jabra also supplies a downloadable software package to further customize the user experience; I did not go that far – if it works just fine as is, why bother?

Summary

A very nice unit.  If you are looking for a travel device that connects to both laptop and cell so as to minimize your packing list, this should be on your list of contenders.

image

You can get your very own Jabra Motion UC+ MS right here.

YMMV

2014/04/21

AudioCodes BToE Preview

I was offered the opportunity to take a look at the upcoming release of the AudioCodes Better Together over Ethernet beta.  Comments here are related to that beta, acknowledging that this is a beta, and I was asked to run it through the ropes (as I see them) and comment.

What is BToE?

BToE is part of the AudioCodes One Voice – a comprehensive offering of tools and devices that enhance the Lync Server environment with gateways, devices, and management to provide (a single neck to choke) an end-to-end set of solutions.  Simply, BToE allows the desktop Lync client to connect to the AudioCodes desk telephone (400HD series) without a USB tether.  There are some phones on the market that do a full USB tether (Lync Phone Edition) – but not everyone wants to spend that type of money for all of their users – one of the key points for Lync is reduced cost.  BToE allows the user to connect the phone to their desktop and essentially make the phone an extension of the Lync client enabling concepts such as click-to-dial and controlling the phone login from the client.

The provided documentation explains BToE thusly:

  • Lets users pair their AudioCodes IP phone with their Microsoft Lync client on their PC or laptop,
    over Ethernet, and from their PC or laptop control phone operations such as answer incoming
    calls, make outgoing calls (click-to-dial), hold and resume calls, and initiate/join an online meeting
    or Lync conference using their Lync client.
  • Allows mirroring of each call on both the AudioCodes IP phone and the PC, so that calls can be
    controlled from either the IP phone or the PC, adding substantial value to AudioCodes unified
    communications.

Diving in

AudioCodes provided me with application drivers, pre-release firmware and application documentation, and firmware updates for the 420HD, 430HD, and 440HD phones.  I used a 420HD which I happen to have handy right on my desk.  I tested with my corporate account, not using a VPN.  The phone needed  the firmware update, the computer needed the application install, and my brain needs more operation cells – the two I have are already full.  Hey, and this time, proving that even *I* can learn, I actually read the documentation prior to pushing buttons.  Go me!

The firmware upgrade (on a 420HD) was seamless.  Setup an FTP server (I use FileZilla) (you probably already have this in some flavor, or a TFTP if you are running more than a few AudioCodes phones – or anyone else’s Lync phones), setup the DHCP option 160, and away it goes. At phone boot time, the phone reads the DHCP Option 160 data, connects, and upgrades itself, reboots itself, and then it is ready. This took about 2 minutes. Nice.

image

As a side note, I did not have this setup completely in my lab, which requires a different domain name; I set this up in my operational environment so I could test against a fully live corporate account.

With the phone sitting there waiting for login, I then installed the AudioCodes BToE application. I initially tried to install on a Windows 8.1 – I even tried compatibility mode on the msi.  Nope.  This caused me to open a virtual machine for the remainder of this test. The install was flawless, but only on Windows 7. Oopseyo!.   What about Windows 8.x?  I will assume that this will be addressed prior to actual release – I am not back-revving my core laptop just for this.

Once the application is installed, the documentation walks you through getting the pair code from the phone – according to a briefing given by devs at AudioCodes, this pair code is essentially the phone’s IP address.  Once entered into the application, the code does not go away (nice), but be aware if the phone ever changes IP, that code won’t work anymore.  Also not clear in the documentation was the need for the Lync 2013 client to be logged in first before pairing the phone – or at least that was my experience.  I could be just looking at the process wrong also; but maybe something to be alert to?

(beta) Findings

I would like to see the app minimize to the system tray instead of the task bar, but that could just be me.

image

For a non-domain joined machine, the BToE application which logs you into the phone did not pick up the need for a separate domain name (in my case my SIP address is different from my UPN).  However, I was able to add it in the dialogue box, at which point the phone just worked.  Login was quick and painless at that point.  Disconnecting the AudioCodes BToE application did not cause the phone to log out.  So you could use this little app to make the phone login much easier as the dial pad data entry can be a real pain.  And remote/external users cannot use PIN auth login like an internal user which forces them to do the dial pad routine, so this app could be right handy in those situations.

image

Logging out of the PC Lync client left the phone logged in and fully functional.  Nice.  Disconnecting the application from the phone left the phone logged in also.  Nice.

Not so nice, after observing that the Lync client needs to be logged in before pairing the device is that I closed everything, disconnected from the phone, and then rebooted my test Win7 VM.  On restart, the AudioCodes BToE app was already connected to the phone – BEFORE Lync logged in.  This might be because on my test VM I don’t have Lync starting with Windows.  Maybe the app could have a few lines of code added to detect Lync status prior to connected to the phone automatically?

According to the documentation, video calls will not work when BToE paired.  I sure hope this is resolved soon; I am a confirmed video call user – especially when working with customers.  OTOH, click to call works perfectly; start the call using the desktop client, complete the call using the phone device.  SWEET!  The desktop client shows the video device is there; you can use the appropriate Lync buttons to start a video call, the call actually hooks up as expected, but….no audio.

Disappointed smile

All other claimed features worked as advertised.  Click-to-call, transfers, holds, etc.  I really liked be able to click in the PC Lync client to start the call and have my phone functional for the actual call. So nice for us speaker phone talkers.

As an enhancement, and I have no idea how this would work, but if the phone is BToE paired to a full desktop, it would be really cool if the phone’s “personal” directory picked up the clients contact list.

How did it go?

Overall, this beta is impressive in that it delivered (with some minimal hassles) what amounts to a USB phone tether.  Video calls aside, my testing showed that my phone now becomes a fully-enabled Lync device.

One highlight is the ability for the BToE concept to get around the login terror for the remote/external user. This item alone make the AudioCodes BToE worth consideration for those users forced to login to the phone using the traditional phone keypad which requires dexterity, close attention to detail, and brain cells that are not already at capacity.

I could use the BToE right now, even as it exists in this beta.  I saw no stability issues, the app handled the phone as expected, and with the proviso that the app installs on Windows 8.x, I see a net gain for the administration side as well as the user side of the Lync experience.

YMMV.

2014/04/03

Lync 2013 Disable Video

So, the customer, for various reasons, wanted to disable video but leave audio enabled.  Usually, the request is to disable audio AND video.

Disabling the audio AND video is pretty straightforward:

set-csuser john.weber –audiovideodisabled $true

But we wanted the audio to be enabled, with just the video turned off.  And we did not want to go mucking around with users disabling cameras, or setting a GPO to turn things off at the driver level, or some other esoteric solution.  What we wanted was to not allow video but allow all other modalities.  And we wanted to be able to undo this solution when the time came to turn video back on.

It would seem that using a Conferencing Policy would be a good choice, but the options offered up by the Lync Control Panel merely control what is available for the conference, not what the individual user can and cannot do P2P or in conference.  Here is what the Lync Control Panel offers:

image

Handy, but setting this to “Enable IP Audio” did not stop the user from starting a video call in a P2P scenario.

AllowIPAudio

Optional

System.Boolean

Indicates whether or not computer audio is allowed in the meeting. The default value is True.

This setting applies to the user who organizes the conference: if set to False, no conference created by a user affected by this policy will allow IP audio. However, the user can take part in other conferences where IP audio is allowed.

AllowIPVideo

Optional

System.Boolean

Indicates whether or not computer video is allowed in the meeting. The default value is True.

This setting applies to the user who organizes the conference: if set to False, no conference created by a user affected by this policy will allow IP video. However, the user can take part in other conferences where IP video is allowed.

But, to Lync, everything is pretty much a conference of one sort or another, so maybe Conferencing Policy can still help us?  Looking down the list of options for a Conferencing Policy we see this little gem:

EnableP2PVideo

Optional

System.Boolean

If True, users will be able to take part in peer-to-peer video conferencing sessions. The default value is False.

This setting is enforced at the per-user level. That means that one user in a peer-to-peer communication session might be allowed to use video while the other user is not.

Now we be cooking with gas!  Be aware though, setting this at the conference policy level DISABLES the camera options in Lync for the users that have been granted the particular policy in question.  As in the video button in the client is gone.  Not just greyed out; gone.

This approach met our needs, but you need to examine the possible impacts to your users – this totally disables video.  With this set to $False, the affected users cannot use video at all, in any modality – even if the Conference Policy is set to “Enable IP audio/video” this attribute disables the local camera and any video.  The user will still get the audio portion of the conference, but no video at all.

YMMV.

2014/03/12

Lync and Exchange on a single IP

Background

First off, many kudos to fellow MVP Michael Van Horenbeeck, who published this article that got me started down the road to success.  Then, I suggest reading the NextHop article on the very similar subject.

Then, just to make sure everything is understood, read the official Lync documentation on Reverse Proxy.  Once you wade through that, you will also need to get a solid re-read of the Van Horenbeeck piece.  Because we are going to be using Kemp LoadMaster for this exercise, I strongly suggest reading the following:

Further reading here may help you out also.  However, with any luck this will not be an issue if you keep current on your Kemp firmware.

Scenario – what is the point?

As IPv4 address availability becomes tighter and tighter, more customers are starting to seriously push the question: “are all those public IP addresses REALLY needed?”  Most, if not all, of my clients already have an external IP being used for Exchange services.  Well, the answer is, no, not really, but it depends (as always).  For a smaller deployment, a single external IP can work.  I would prefer to see TWO (2) external IP, one for Lync SIP, WC, and AV, and one for Reverse Proxy.  While we can use the external IP already serving Exchange web services, this article will demonstrate a single external IP for all Lync and Exchange. 

As a huge point; this is an exercise in proving something can be done.  There are parts and pieces that I hope will be useful to someone else.  However, this solution may not be well suited for an actual environment because the Lync Edge ports have moved away from something that a corporate firewall will typically allow.  Specifically using 444, 446, and 447 for Lync Edge services will usually cause federation to other entities to fail.  Using this solution set for Lync Edge may also cause issues with Audio/Video media traffic. If you don’t need/want federation, then the entirety of this may be on target.  That is not the norm for what *I* see and I caution you to think this through before trying this in a production environment.  Remember my comment above about how I would want two public IP’s?  This is the reason.  YMMV.

As a final explanation, what I will demonstrate here is probably NOT a supported configuration per se, but there is no reason to think that anything here is unsupported just because this configuration is not explicitly called out in the documentation.

If you read between the lines carefully, you will also see that the existing Exchange web services IP could easily double up for the Exchange and Lync web services. You may also note that I have two complete Exchange organizations being supported with this environment- one with Lync, and one with no Lync. I will not cover the setup of the routing for the core Lync Edge services, but if you take a look at the following environment diagrams, you will see what is needed there and this article will concentrate on the configuration of the Kemp (or any other HLB) to handle the web services.

As a side note, I use Kemp because of the ease of deployment.  I find that the configuration and deployment tasks are very straightforward.  This is not to say that an existing HLB can’t accomplish these tasks, but I don’t have specific knowledge of those other devices.  The concepts will be the same, but the tasks to achieve the same outcomes on different hardware will be different.

If you have gotten this far, and you still want to move forward, let’s do it.

Environment

Here is our exercise environment to accomplish what we want. Note that I have ignored some of the traffic streams in this view; what is important is understanding the relationship between the domains, the load balancer/reverse proxy, and the subnets.

image

Once you have that digested, take a look at this one, and then go back and forth until you have a solid understanding.  This has a good deal more detail; it shows all the ports and traffic types.  As a logical diagram, the load balancer is sitting in the middle of all this; specifically dealing with all the web-based traffic and parceling out the traffic based on rules.  The load balancer has one leg in each network; its’ default network is the 10.10.10.0 net and the default gateway is, as expected, on the default network.

image

Certificates

As you might think, the load balancer is going to want a certificate or two so that it can represent itself to clients as the service requested, decrypt the SSL stream as needed, and then re-encrypt before sending it down to the real servers that make up the virtual service.  Because these certs were wildcards and my intent was only to use them on the load balancer, I used the Digicert Cert utility (what a nice piece of gear) to create, import, and export the certificates.  The Kemp does not seemingly care about trusted roots so both of my internally generated certificates worked just fine. In my case, I generated two wildcard certificates, one from the CA in each domain.  In a real world situation, I think that a public wildcard would work better.

Here are the PKI certificates installed on the Kemp.  Note that the domain1 certificate is only assigned to the one Virtual Service while the domain2 certificate is assigned to both.  This is because the VS on the 10.10.10.0 network needs to handle URL’s from both domain1 and domain2, while the VS on the 1.1.1.0 network only needs to handle domain2.

image

Content Rules

At this point, the content rules are needed.  You did read all the documentation mentioned above, yes?  If not, I suggest you do so now.  We’ll wait right here until you get that done.

Here are the content rules needed. Notice how some of them appear as both .net and .com.  I have two separate Exchange instances running so I need to differentiate – hence some of the content rules get doubled with the not-so-subtle URL change between .net and .com.  You can refer back to Mr. Van Horenbeeck’s article and get really fancy with these rules, but I went with the brute force simple method.

image

Virtual Services

Now we get to make some Virtual Services.  Did you really read all that documentation?  Good. I am horrible on reading documentation, and it bites me almost every time.  You would think that I would learn, eh wot?  Apparently not.  Adelante!  Here is the VS construction.

image

Note that VS 3, 4, and 5 are blue?  Because they have subVS instances living under them.  Here is the same stack, expanded.

image

Observe that while the far left column indicates the landing spot of the client on 443, the “Real Servers” column indicates the underlying server and the port changes, if any.  I think the virtual services homed on the 1.1.1.0 net are self-explanatory – well, except for maybe #3.  So let’s look at that one, and once you understand that, I think the 10.10.10.58:443 VS will make sense also.  Remember that external URL requests landing on the external VS need to be translated from 443 to 4443 and from 80 to 8080.

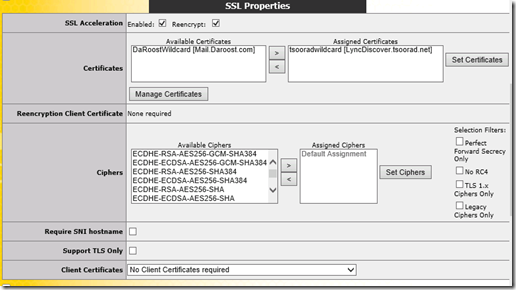
image

image

image

The interesting part is the “Advanced Properties” section where doodly-squat is done until AFTER the subVS object are created.  At which point you need to cycle back to this level and enable content switching.  You did read that stack of documents, yes?  Oddly, when creating the subVS objects, I had some inconsistent results when assigning the content rules which sometimes necessitated enabling the content rules at each level in reverse order, and sometimes as described in the documentation. Perhaps it was just me.  But know that, in the end, the Kemp needs to look like this or traffic will go nowhere even if the VS does ping back at you.

Here is subVS “LSWebInt” in detail. And yes it looks very much like the top level.  And is configured with the same items and settings.  Except note that the certificate is now missing.  Because the top layer is handling that slice of life.

Another important piece is for you to start comparing the “Selection Rules” as indicated in the pictures.  Note that the numbers of rules match up.  Now, I would have thought that assigning a rule at the bottom level would trickle up through the construction and be reflected at each layer above.  But….NO! So, when putting all this together, make sure you know what goes where; the Kemp WUI is not going to keep track of it for you.  If you add a rule at the subVS level on ONE of the real servers, do not expect the other server to know about it, don’t expect the Advanced Properties to magically catch on to things, and the high level VS won’t get it either.  Conversely, if you assign rules at the top, do not expect those rules to flow down logically just because there is an underlying service.

image

image

Grrrr.  Make yourself a table that lays out what you need, where it comes from and needs to go, and what content rule controls that.  You do document things, right?  If not, don’t come crying to me later not knowing what you did several months back and now don’t understand.  Adelante.

The Big Picture

You might be interested to know how I am running both sets of SMTP traffic through only one port 25 connection?  External Relay domain from domain1 to domain2.  A tad clunky, but hey, I only have one IP to work with (I’m cheap but not easy).  And I want to reinforce the Lync Edge in all this.  I am using single IP Edge, with ports 444, 446, and 447 for SIP, WC, and AV services.  And again, this is NOT recommended if you are expecting ubiquitous federation to work.  Most of the world will expect to be able to talk on 443 to your domain, and this construction is snaking all 443 to the load balancer for Exchange and Lync web services.

With all 443 traffic landing in one spot, we can use Kemp (or any other load balancer or device/appliance that supports this concept) Content Rules to send the URL to where we need it to go.  Routing and network relationships need to be figured out in advance, as do the Content Rules and the subVS’s that are actually handling the traffic.

While this exercise did a bit more than is normal for an organization, what with two Exchange organizations and only one Lync environment and using only one public IP, I think the point is made about bringing all 443 traffic to one spot and having (Kemp in this case) something decide where to send the traffic based on requested URL.  If I had more resources, and wanted to do this for a real organization, I would use one IP for Lync SIP, WC, and AV, and use another public IP for all 443 traffic.  Thereby saving precious IP resources which was the original goal.

YMMV.

2014/03/07

Kemp 7.0.12a Two Arm bug

Update: 14 March 2014

According to Derek Kiely (Kemp), the fix will be in a 7.0-14 firmware release due out this month (see his comment below).


The Issue

Working in my lab making sure I know what I am doing with a two-arm Kemp LoadMaster configuration.  Here is what I am attempting to setup:

image

I am using a Kemp VM100 (firmware 7.0.12a) with content rules to redirect 443 traffic to various target virtual servers.  Specifically, the LM has one leg in 10.10.10.0./24 and one leg in 1.1.1.0/24.  HTTPS comes into a Virtual Service on one single IP (10.10.10.58) and uses various rules to redirect traffic to either a 10.10.10.0/24 network host or a 1.1.1.0/24 network host.

According to the super-helpful folks at Kemp support, there is a bug in Kemp firmware 7.0.12a that results in abysmal failure on this setup.  Apparently, the traffic is landing on the 10.10.10.58 service correctly, and heading off to the underlying real server correctly, but it is arriving at the 1.1.1.73 (my Lync WAS test case) as a 10.10.10.58 source when it should be showing up as a 1.1.1.x source. 

But what do I do NOW?

The fix is to put a static route into the target real server.  Here is my LyncWAS server (1.1.1.73) route table with the fix in place. If you are curious, the command is (from an elevated CMD):

Route add –p 10.10.10.58/32 1.1.1.5

This identifies the traffic from the virtual service on the LM and send responses back to the LM on 1.1.1.5 which knows what to do with the traffic.

image

Why does this work? 

Well, the traffic shows up on the LyncWAS (1.1.1.73) but appears to be originating from the KempLB but from the 10.10.10.58 address (which is correct from one point of view).  But the 1.1.1.73 server thinks that to get to the 10.10.10.0 network, it needs to talk out its’ default route of 1.1.1.2.  And your connection fails because the real server is sending responses out the wrong gateway.  By adding the static route for the expected source IP, and pointing it to the KempLB, we now have a coherent route for the traffic.  A bit clunky for now, but it works.

My thanks to Kemp Tech support for identifying this issue.  Kemp is providing a fix in the next release which is due out shortly.

YMMV

test 02 Feb

this is a test it’s only a test this should be a picture