About Me

My photo
This is a blog for John Weber. One of my joys in life is helping others get ahead in life. Content here will be focused on that from this date forward. John was a Skype for Business MVP (2015-2018) - before that, a Lync Server MVP (2010-2014). I used to write a variety of articles (https://tsoorad.blogspot.com) on technical issues with a smattering of other interests. I have a variety of certifications dating back to Novell CNE and working up through the Microsoft MCP stack to MCITP multiple times. FWIW, I am on my third career - ex-USMC, retired US Army. I have a fancy MBA. The opinions expressed on this blog are mine and mine alone.

2008/01/31

e2k7 powershell commands 1

display mailbox stats by name, item count, total size, host server

I get asked how to view simple stats in Exchange 2007 - like which are the biggest mailboxes? Or, who has the greatest number of items.

Here are a few powershell commands you can use.  

Get-MailboxServer | Get-MailboxStatistics | select displayname,itemcount,totalitemsize | ConvertTo-HTML | Out-File C:\Test.htm

get-mailbox | get-mailboxstatistics | FT displayname, itemcount, totalitemsize, servername

get-mailbox | get-mailboxstatistics | select-object displayname,itemcount,totalitemsize | export-csv c:\mailboxsurvey2.csv

get-mailbox jweber | get-mailboxstatistics | select-object displayname, itemcount, totalitemsize, lastloggedonuser, lastlogontime, lastlogofftime, servername, databasename | export-csv c:\exchangereports\userstats.csv

list email users (e2k7)

<disclaimer - this is not my work - I horked it from somewhere, I am just sharing it>

Do you have a lot of users? Do you wish you could list them by size, name, number of items?

Get-MailboxStatistics | sort-object -descending totalItemSize | select -first 5 | ft DisplayName, @{expression={$_.totalitemsize.value.ToMB()};label=”Mailbox Size(MB)”}, itemcount, lastlogontime

Change the “select -first 5″ to whatever number you like.

ws08 hibernate

Believe it or not, the ws08 server comes with hibernation turned on.

And you cannot turn it off from the gui.

Turn it off from the CLI

Powercfg /hibernate off

I understand that maybe working with UPS units might be a good option to use hibernate - it may come back to life faster and with no service startup issues.

But what if you have a server with 16GB RAM and all of a sudden you have this hibernate.fil sitting on the root of C?

Wow. 

WS08 Server Core Terminal Services Mgmt

turn remote desktop on:


cscript scregedit.wsf /ar 0

If you want xp workstations that don't have the vista rdp client (v6) to be able to connect, then you need:

cscript scregedit.wsg /cs 0


Clear as mud, eh?

ws08 core firewall for RDP

To enable the WS08 firewall to allow RDP do the following


Ws08 core netsh

Netsh advfirewall firewall set rule group="Remote Desktop" new enable=yes

Outlook attachment size error

Do you get this error in Outlook and Exchange 2007.

Finding the fix took me a bit of time, so here is how to fix it.

I cannot remember where I found this, but kudos to whoever posted it.

image

Start adsiedit and locate

Configuration => Configuration => Services => Microsoft Exchange => First Organisation => Global Settings => Message Delivery

Right click the Message Delivery container, and choose Properties. In the Attribute list, locate DelivContLength and SubmissionContLength.

I suspect both values are set to something like 10240. If the values are present and set, double click both attributes, and then click the Clear button followed by the OK button. At this point the value should be <Not set>.

In my case, an unlimited size was not desireable, so do a little math.  The 10240 roughly equals a 10MB attachment. You can set something like 100000 for 100MB or 25000 for a 25MB attachment.

Now, either allow for a replication cycle to go through, or force a replication. Then restart the Exchange Services. Perform a test to see if the actions performed yielded the desired results

The screenshot shows the first of the two.  In my virtual that was behaving like your environment, both of these had a 10240 in them.

clip_image001

VMWare & AMD dual core cpu clocks

With the growing wave and industry push to virtualize, and my recent (unpleasant) experience with vmware workstation and AMD dual core CPU's, I thought would put together a few observations.

1.  This problem did NOT exist under VPC or VS2005r2.  Don't know why; same host hardware, same RAM, same CPU, same host OS build.  But, it sure did not happen.

2.  The problem existed with VMWare Workstation 6.0.2, and it also happened under v5 and v6.0.

3.  CPU is AMD Turion x64.  From reading the internet, it also occurs with Athlon x64 and Opteron.  The AMD website has drivers for the Phenom series, so I assume that the issue exists with their new chips.

4.  Symptoms are that the guest OS runs the clock at least 300% faster than the host clock. 

a. This is caused by the host OS not handling the CPU TSC (time stamp counter) correctly. 

b. This is a Windows thing. 

c.  The issue is all about the hardware and the OS.  Empirically, Windows handles Intel chips  differently than the AMD chips.

5.  There are a variety of suggestions: here is what worked for me.

First make sure that global config.ini for vmware has the following contents:

This file is USUALLY located:  "c:\documents and settings\all users\application data\vmware\vmware workstation" - it will be different for a Vista host.

The first line is the rating of your cpu in gHz.  Mine is a 2.0, but the host reports it as 1994mHz.

host.cpukHz = "1994000"
host.noTSC = "TRUE"
ptsc.noTSC = "TRUE"
host.TSC.noForceSync = "TRUE"
prefvmx.useRecommendedLockedMemSize = "TRUE"

a.  http://www.amd.com/us-en/Processors/TechnicalResources/0,,30_182,00.html

Each AMD cpu has an "updates, drivers, & utilities" section.  Each one appears to be a tad different.

This driver is seriously needed just so that Windows and *nix (certain kernel levels) know how to handle the cpu. 

In my case, this was the first step - a side note - it sped up my host system by about 10-15% - or so it seems.

b.  Windows MS KB 896256 and  the AMD Dual-Core Optimizer. In theory, the MSKB does the same thing, but it only made things better, it did not FIX IT.  The installation of the AMD tool onto the host is what fixed things.  I have both installed on the host.

c.  Random observations - my XP guest detected an AMD driver update when I did all the updates.  The ws03 and ws08 updates did not find this.  And, as you may have guessed, this little update did not help anything.  Installing the AMD cpu driver into the guest did absolutely nothing to help things.

Politics defined

Poli = many

tics = blood sucking insect


'nuff said.

Outlook 2007 Certificate Error

I am reposting this because it took me a goodly amount of time to find this information/fix when I encountered it - Shudnow.net is the source - I did not have to use every step, but I did faithfully work through each item just to make sure.

Let's get started!

When importing a new certificate into Exchange 2007, you might encounter a certificate error in Outlook 2007. I have included a screenshot of the error I encountered today:

clip_image001

When you choose the View Certificate button, it brings up another window that shows you what certificate is in error. In this case, the certificate name is “mail.shudnow.net.”

So the million dollar question? Why the error?

Well, when we install a new certificate, there are a few tasks we want to do. Obviously, we install the certificate for a purpose. This purpose is till allow us to use Exchange services securely. So how do we enable Exchange to use these services? If you are planning to do a very simple configuration and do not care about external Autodiscover access, you do not need to use a Unified Communication Certificate. You can read more about these certificates in one of my other articles here.

So let’s say we have a simple regular common certificate. A certificate with a Common Name (CN) of mail.shudnow.net We install this certificate onto our Exchange box with its’ private key. In our case we were migrating so we did not have to request a certificate via IIS. We just exported it with its’ private key and imported onto the new box. We then assigned this certificate to IIS. Now I went to the Exchange Management Shell and enabled Exchange services to use this certificate. In order to do this, you must run the following commands:

Get-ExchangeCertificate

Thumbprint Services Subject

———- ——– ——-

BCF9F2C3D245E2588AB5895C37D8D914503D162E9 SIP.W CN=mail.shudnow.net.com

What I did was go ahead and enable all new services to use every available service by using the following command:

Enable-exchangecertificate -services IMAP, POP, UM, IIS, SMTP -Thumbprint BCF9F2C3D245E2588AB5895C37D8D914503D162E9

The next step would be to ensure the AutodiscoverInternalURI is pointed to the CAS that will be your primary CAS for Autodiscover servicing.

Get-ClientAccessServer -Identity CASServer | FL

AutoDiscoverServiceInternalUri : https://casnetbiosname/Autodiscover/Autodiscover.xml

See the issue here? We are not using a UC certificate that contains the names, “casnetbiosname, casnetbiosname.shudnow.net, mail.shudnow.net, and autodiscover.shudnow.net” Since the Autodiscover directory in IIS will be requring SSL encryption, the url specified in the AutoDiscoverServiceInternalURI must match what is specified in your certificate. You must also ensure there is a DNS record that allows mail.shudnow.net to resolve to your CAS. We should re-configure the AutoDiscoverServiceInternalURI by using the following command:

Set-ClientAccessServer -Identity CASServer -AutoDiscoverServiceInternalUri https://mail.shudnow.net/Autodiscover/Autodiscover.xml

We now need to go configure all the InternalURLs for each web distributed service. Here is the reason why we were receiving the certificate errors. Your InternalURLs most likely are not using mail.shudnow.net. Your InternalURLs are most likely pointed to something such as https://casnetbiosname/ServiceURL which will fail since this is not the CN of your simple certificate.

You can run the following commands to fix your internalURLs so your Outlook 2007 client can successfully take advantage of your web distribution services.

Set-WebServicesVirtualDirectory -Identity “CASServer\EWS (Default Web Site)” -InternalURL https://mail.shudnow.net/EWS/Exchange.asmx -BasicAuthentication:$true

Set-OABVirtualDirectory -Identity “CASServer\OAB (Default Web Site)” -InternalURL https://mail.shudnow.net/OAB -BasicAuthentication:$true

Enable-OutlookAnywhere -Server CASServer -ExternalHostname “mail.shudnow.net” -ExternalAuthenticationMethod “Basic”-SSLOffloading:$False

Set-ActiveSyncVirtualDirectory -Identity “CASServer\Microsoft-Server-ActiveSync (Default Web Site)” -ExternalURL https://mail.shudnow.net/Microsoft-Server-Activesync

Set-UMVirtualDirectory -Identity “CASServer\UnifiedMessaging (Default Web Site)” -InternalURL https://mail.shudnow.net/UnifiedMessaging -BasicAuthentication:$true

Elan Shudnow :: Aug.10.2007 :: Exchange, Microsoft :: No Comments »

Allowing Application Servers to Relay off Exchange Server 2007

I get asked, or I hear this question, repeatedly. Clearly, this is a function that needs implementing in almost every organization. I use option 1 (read below). There have been times when I created several of these - it makes admin a lot easier if you have many subnets or individual IP addresses to include.

(this material is not my creation, I am merely posting this)

From time to time, you need to allow an application server to relay off of your Exchange server. You might need to do this if you have a SharePoint, a CRM application like Dynamics, or a web site that sends emails to your employees or customers.

You might need to do this if you are getting the SMTP error message “550 5.7.1 Unable to relay”

The top rule is that you want to keep relay restricted as tightly as possible, even on servers that are not connected to the Internet. Usually this is done with authentication and/or restricting by IP address. Exchange 2003 provides the following relay restrictions on the SMTP VS:

clip_image001

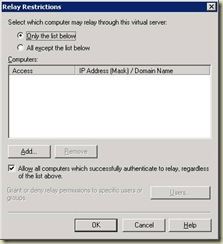
Here are the equivalent options for how to configure this in Exchange 2007.

Allow all computers which successfully authenticate to relay, regardless of the list above

Like its predecessor, Exchange 2007 is configured to accept and relay email from hosts that authenticate by default. Both the “Default” and “Client” receive connectors are configured this way out of the box. Authenticating is the simplest method to submit messages, and preferred in many cases.

The Permissions Group that allows authenticated users to submit and relay is the “ExchangeUsers” group. The permissions that are granted with this permissions group are:

NT AUTHORITY\Authenticated Users {ms-Exch-SMTP-Submit}

NT AUTHORITY\Authenticated Users {ms-Exch-Accept-Headers-Routing}

NT AUTHORITY\Authenticated Users {ms-Exch-Bypass-Anti-Spam}

NT AUTHORITY\Authenticated Users {ms-Exch-SMTP-Accept-Any-Recipient}

The specific ACL that controls relay is the ms-Exch-SMTP-Accept-Any-Recipient.

Only the list below (specify IP address)

This option is for those who cannot authenticate with Exchange. The most common example of this is an application server that needs to be able to relay messages through Exchange.

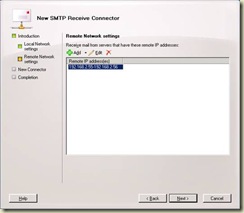
First, start with a new custom receive connector. You can think of receive connectors as protocol listeners. The closest equivalent to Exchange 2003 is an SMTP Virtual Server. You must create a new one because you will want to scope the remote IP Address(es) that you will allow.

clip_image002

The next screen you must pay particular attention to is the “Remote Network settings”. This is where you will specify the IP ranges of servers that will be allowed to submit mail. You definitely want to restrict this range down as much as you can. In this case, I want my two web servers, 192.168.2.55 & 192.168.2.56 to be allowed to relay.

clip_image003

The next step is to create the connector, and open the properties. Now you have two options, which I will present. The first option will probably be the most common.

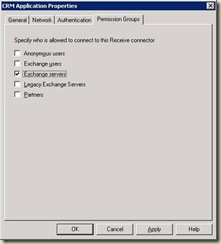
Option 1: Make your new scoped connector an Externally Secured connector

This option is the most common option, and preferred in most situations where the application that is submitting will be submitting email to your internal users as well as relaying to the outside world.

Before you can perform this step, it is required that you enable the Exchange Servers permission group. Once in the properties, go to the Permissions Groups tab and select Exchange servers.

clip_image004

Next, continue to the authentication mechanisms page and add the “Externally secured” mechanism. What this means is that you have complete trust that the previously designated IP addresses will be trusted by your organization.

clip_image005

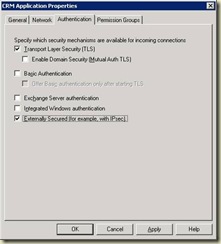
Caveat: If you do not perform these two steps in order, the GUI blocks you from continuing.

Do not use this setting lightly. You will be granting several rights including the ability to send on behalf of users in your organization, the ability to ResolveP2 (that is, make it so that the messages appear to be sent from within the organization rather than anonymously), bypass anti-spam, and bypass size limits. The default “Externally Secured” permissions are as follows:

MS Exchange\Externally Secured Servers {ms-Exch-SMTP-Accept-Authoritative-Domain}

MS Exchange\Externally Secured Servers {ms-Exch-Bypass-Anti-Spam}

MS Exchange\Externally Secured Servers {ms-Exch-Bypass-Message-Size-Limit}

MS Exchange\Externally Secured Servers {ms-Exch-SMTP-Accept-Exch50}

MS Exchange\Externally Secured Servers {ms-Exch-Accept-Headers-Routing}

MS Exchange\Externally Secured Servers {ms-Exch-SMTP-Submit}

MS Exchange\Externally Secured Servers {ms-Exch-SMTP-Accept-Any-Recipient}

MS Exchange\Externally Secured Servers {ms-Exch-SMTP-Accept-Authentication-Flag}

MS Exchange\Externally Secured Servers {ms-Exch-SMTP-Accept-Any-Sender}

Basically you are telling Exchange to ignore internal security checks because you trust these servers. The nice thing about this option is that it is simple and grants the common rights that most people probably want.

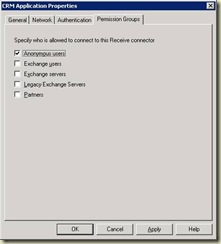
Option 2: Grant the relay permission to Anonymous on your new scoped connector

This option grants the minimum amount of required privileges to the submitting application.

Taking the new scoped connector that you created, you have another option. You can simply grant the ms-Exch-SMTP-Accept-Any-Recipient permission to the anonymous account. Do this by first adding the Anonymous Permissions Group to the connector.

clip_image006

This grants the most common permissions to the anonymous account, but it does not grant the relay permission. This step must be done through the Exchange shell:

Get-ReceiveConnector "CRM Application"  | Add-ADPermission -User "NT AUTHORITY\ANONYMOUS LOGON" -ExtendedRights "ms-Exch-SMTP-Accept-Any-Recipient"

In addition to being more difficult to complete, this step does not allow the anonymous account to bypass anti-spam, or ResolveP2.

Although it is completely different from the Exchange 2003 way of doing things, hopefully you find the new SMTP permissions model to be sensible.

More information

See the following for more information:

test 02 Feb

this is a test it’s only a test this should be a picture